While working on the DWV plumbing, I’ve found some tools to be extremely useful to have around. Most I expected but some were a surprise.
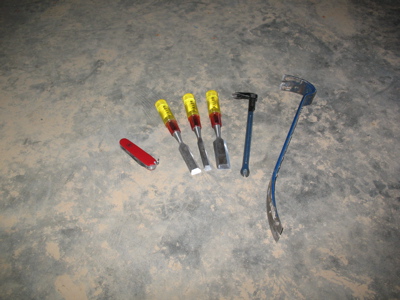 A selection of hand tools. I used the awl on my pocket knife (far left) to help get the disks out of the hole saw. The chisels were what I was most surprised to need. I ended having to cut a small notch into a beam to get some fittings in the right place as well as tear out a bit of drywall backer on the ceiling. Throughout the construction process I’ve found chisels to be amazingly versatile and helpful to have around. I won’t ever start a construction project without a chisel or two in my bags. The nail pullers/pry bar were helpful both in removing studs (I put them back after I got fittings in place) and for helping to tear out the drywall backer same as the chisels. I even used the small puller to help get some recalcitrant hole saw slugs out of the hole when there was an errant nail keeping them down.
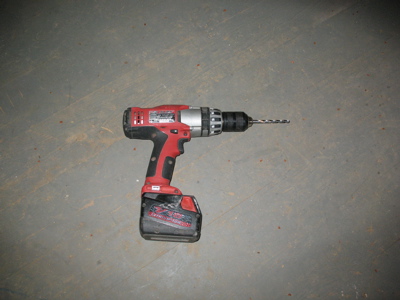
When you need to make a hole to carry a pipe from downstairs to upstairs and there’s no room to drill it from downstairs, how do you know you’re drilling in the right place? My method is to mark the whole location on the bottom of the floor and measure off the nearest (exterior) walls to wee where it should go upstairs. Then I climb down off my ladder, trudge upstairs and measure off the walls again to get a mark on the top of the floor. Now, I have a mark on the bottom, and a mark on the top, but no idea how well lined up they are. In comes the cordless drill with the 1/4″ bit. Just drill on my top mark, go back downstairs and see how close I am to my bottom mark and adjust accordingly when I drill with the hole saw.
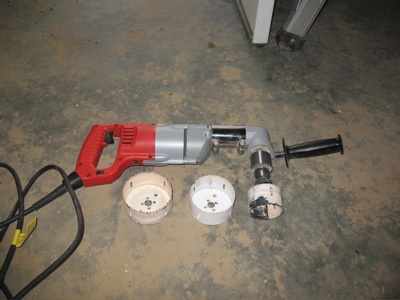 Ah, here’s the tool. I just bought this a couple weeks ago when I realized that I’d have to be doing a lot of drilling between studs and it wouldn’t really work to just keep borrowing one or renting one. I’ve already used it a whole lot and can’t imagine building a house without one. For the uninitiated, it’s a right angle drill. This particular model is more on the prosumer level. It’s not as big, beefy or speedy (or heavy) as the Hole Hawg (also from Milwaukee) but it’s also not as expensive and serves my needs admirably. The main drill body puts out 500 RPM at full go (variable speed controls in the tirgger) and the right angle adaptor (removable) has gears in it so that it can act as a reducer (300 RPM) if you put it on one direction and an increaser (I know that’s not the right word…) (700 RPM) if you flip it the other way. Since I’m mostly doing low torque drilling with hole saws, I’ve just got it on the high configuration. There’s a 2 3/4″ hole saw in the chuck and a 4″ and 3 5/8″ hole saws next to it. I used the bigger hole saws for 3 inch pipe and the smaller one for 2 inch.
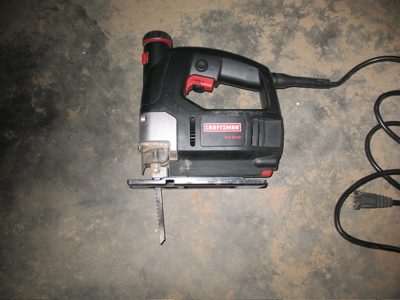
I don’t know about you, but I never would have expected this guy to be as useful as it is. It’s just a basic jig saw but if you put a hole saw hole slightly in the wrong place or it’s just a bit (or more than just a bit) too small for what needs to go through it, this is the perfect tool for enlarging the hole. It’s also pretty small so it fits (albeit barely) when you’re working on top of a wall, 8″ from the ceiling above you inside joists on a 24″ center.
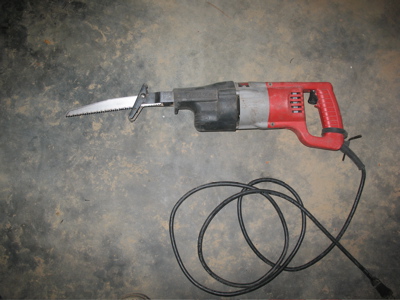
Ah, the sawzall. I’ve been borrowing this from my grandfather for months and it’s super handy to have around. There’s two main things I’ve used the sawzall for while plumbing. Cutting pipe off after it’s glued in place and I realize it’s too long (yes, even with the best of planning, measuring, marking and cutting – it happens) and cutting through nails holding studs in so that I can get the drill or fittings in there. Even though the drill is made to work in stud bays, it still requires close to 12″ of space to work with the hole saw on it and some of my studs bays aren’t that big. I just cut the bottom loose, swing the stud out of the way, drill my hole and then nail the stud back.
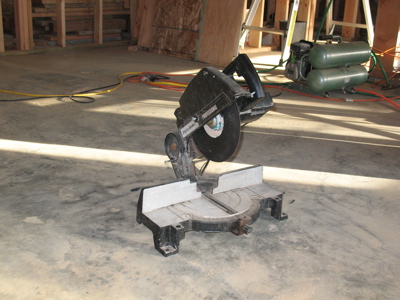
The miter saw with a solid blade. Thanks, Charlie [1]. I’ve seen guys cut pipes with circular saws and sawzalls – I’ve even tried to do it myself. I always have trouble getting a clean cut though. Usually it’s rough or not straight and then I need to work on the pipe before I put it together so that the fitting goes on cleanly. With this though, I can cut through a 3″ pipe in one pass, holding the pipe against the table and I get a nice, clean, straight cut with minimal work. Using the solid blade it’s really melting through the pipe and you don’t get a lot of little hammering blows that you’d get with a standard blade such that might not leave as clean a face.
I didn’t take a picture of my utility knife, but it’s been a big help in the process too, de-burring pipe and making sure it’s ready to fit. Those are the main tools I’ve been using. If I find others as I move on to through the roof work, I’ll post about them as well.
[1] My good friend Charlie gave me his miter saw over a year ago when he moved into a condo that had no place for this level of wood working. It’s been absolutely wonderful to have a second miter saw that I can just keep the solid blade on and use as a dedicated pipe cutter. Thanks very much, Charlie.