We’re well on our way on the next phase of house building – Drain, Waste, Vent plumbing. The last month or so, I’ve been doing a lot of thinking and planning and the last couple of weeks have been busy executing, modifying and adapting the plan.I’m happy to say that I’ve now finished all 3″ waste lines. This means that the main waste stack is finished, toilet lines are in and all underfloor plumbing for the second story meets up with the main waste stack. I started out with about 5 feet of 3″ ABS pipe left over from slab plumbing and bought another 20 foot length when I started interior work. I now have only a 3 inch and a 2 3/4 inch piece of 3″ pipe left. Unfortunately, I also have a handful of 3″ fittings left over from various plan modifications but I figure that that’s just the way things are.I’m doing all my plumbing in 2″ and 3″ lines so that we don’t have any issues with clogs. We’ve had issues with previous places and I’m doing everything I can to avoid it here – one of which is to keep things big.Here’s the current state of things.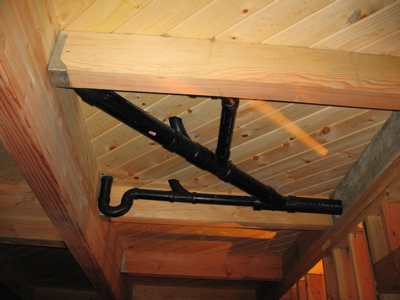 This is what I completed last weekend, but never got around to blogging about. The p-trap in the back left is for the master shower, the combo along that same line to the right is the vent for that line. The pipe that disappears into the left front corner behind the beam is for the master toilet. The combo in that line is its vent. The wye fitting which sends a pipe off at 45° from the toilet line is to bring in the sink drain from the master sink.
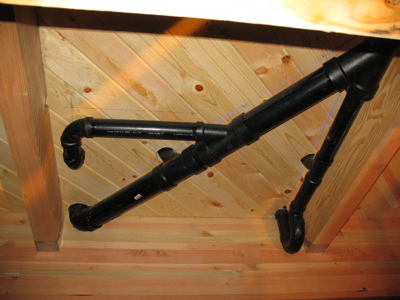 The same pipes, but from a different angle. Now you can see the line for the master toilet (back left) and the sink drain (just in front of it). We’ll have to soffit this space to hide the plumbing. It’s unfortunate to hide the beams and floor but we’ll gain a raceway for electrical lines. I knew from early on that we’d have to soffit here and I considered if it was worth using TJI’s 2 ft on center rather than the 4×8 joists on a 4 ft center. Given how the plumbing worked out, I’m glad I stayed with the 4×8’s because it gave me a much bigger box to work within and I didn’t need to worry about cutting through joists in this space. If you look closely, you can see my chalk and pencil lines on the underside of the floor. These helped me keep my pipes lined up and at the correct angles.
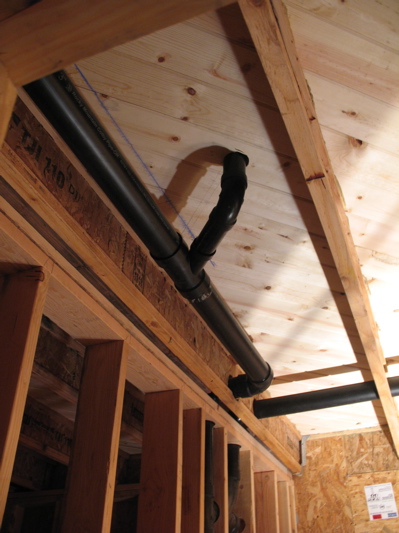 The single 3″ pipe that leaves the bay in the previous photo goes through some blocking that keeps our joists from rolling and enters a bay over the downstairs bathroom. The wye in the middle of the picture is where we pick up the drain from the sinks in the kid’s bathroom. We make a 90° turn and enter the main waste stack towards the back of the picture. The other horizontal 3″ pipe in the picture runs out to the right to the toilet in the kid’s bathroom. The master bathroom waste line joins the main stack with a 3″ san-tee with a 3″-2″ bushing so I can continue the vent straight up.
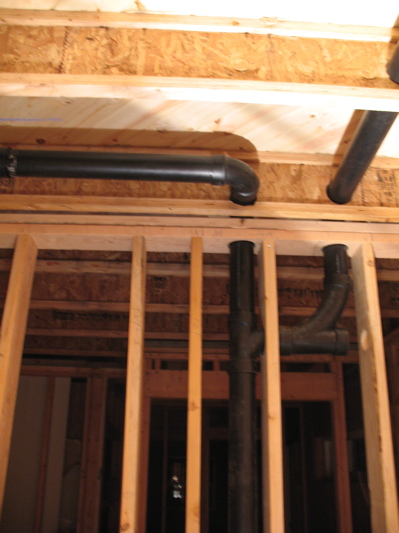 Here’s another shot of that juncture where it’s more clear what’s going on. The master bath waste line is coming in from the left. I’ve got a 3″ san-tee going into a 3″ combo which runs up to a 90° elbow to send the waste line to the toilet in the kid’s bathroom. The other side of the 3″ combo has a 3″-2″ bushing in it and I’ll pick up the drain from the kid’s bath there.
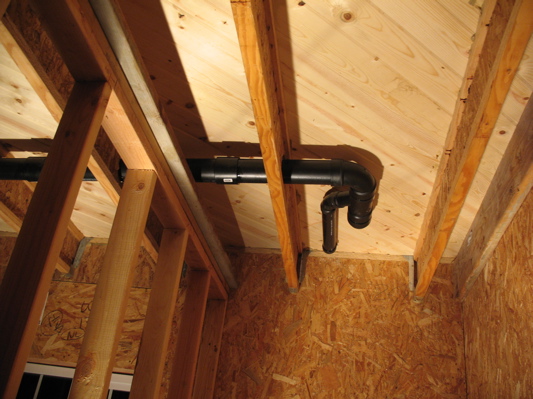 This is the kid’s toilet connection. I’m using a 332 wye with a 45° fitting to run the vent back and behind the toilet. I built a 6″ plumbing wall there that we will put the vent in before running it out the roof.
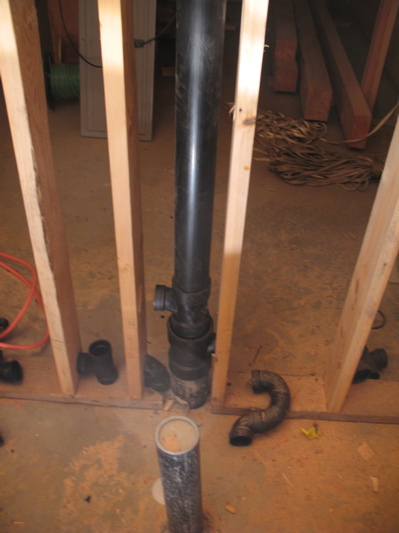 Here’s the base of the main waste stack. There’s a 4″ pipe coming out of the slab. I’ve got a 442 san-tee going right for the washer drain. Inside that is a 4″-3″ bushing so that I can switch to 3″ pipe for my main stack. Then I’ve got a 332 san-tee going left for the bathroom and laundry sinks. I may have to run those drains as 1 1/2″ instead of 2″ so that I end up with my drains at the right elevation. I’ll measure fitting sizes and see what fits. In the foreground is our drain line for the downstairs toilet (still sticking up where we had it when we poured concrete) and the little 90° elbow between the 4″ pipe and the stud on the left is the vent for the toilet. Originally, I was going to run that vent straight up in the same stud bay as the wast stack, but there wouldn’t have been any room to get it past the 332 san-tee for the bathroom and laundry sinks. Moving it over to run up this other bay gives me the space I need to let the pipes pass each other.I still need to put together the washer drain line and the downstairs sink lines, the downstairs shower drain and vent which I didn’t take pictures of, plus a bunch of vent stuff upstairs and the kid’s bath. All-in-all it’s going well. It’s definitely more difficult than I imagined it would be, but I feel like I have the tools now to really do the work. Some of those tools are pretty much what you’d expect but I was surprised at the need for others. I’ll write a follow up post talking about tools.
Nice post, hon! 🙂 Nice work too!
Wow, that’s a fantastic post! I like the way you’ve put it together, AND managed to photograph it. 🙂 Very cool.
Are there no clean-outs in there? I didn’t know if you’d opted not to put them in, or if you just didn’t want to put them there, where they’ll have soffits over them. (And who knew there were SO many choices about how to run pipe, huh? Although it’s pretty fascinating and kind of fun once you get started.)
It’s looking so great. SO great. Do you have an ETA on getting a cert. of occupancy? (Is that what they’re called in CA? The little paper that says you can move in now.)
@Amber – Thanks!
@Dy – As far as I know, I don’t need clean-outs in the lines that you see here. I’ll probably put in a clean-out somewhere in the 2nd story where the 2″ vent continues up from the main waste stack. We do have 3 different clean-outs outside that run to the pipes in the slab and we can always pull a toilet and run a clean-out from there. Also, since the smallest waste lines are 2″, I really don’t think we’ll ever have problems with clogs.
Since I don’t know how long it’ll take me to do the rest of the work, I’m giving out a move-in date of Christmas 2008. In California (at least Nevada County) we pretty much have to be done in order to move in. All bathrooms finished, all drywall up, kitchen complete, etc. Unfortunately, we can’t just finish a part of the house and live there while working on the rest.
This is just my opinion, but I believe in putting a cleanout on most areas of your plumbing. The parts are cheap, and it is much easier to simply unscrew a threaded plug to clean out the lines than to “pull a toilet”. Seal the threaded plug with pipe dope compound to make it easier to unscrew and to better seal out sewer gas.
Another reason to put a clean out, at least for me, is to continue a run for a short distance, then put a clean-out, so that if you need future expansion, you simply cut the clean-out off, with enough straight pipe on each side of the cut to re-use the pieces at least one more time, extend the run with a coupling to connect the new and old pipe, then glue the old cleanout back on the new end of the run.
Looks like good work and good pictures.
Just a comment on California, I hate when governments make you completely finish a building before being able to use it. It’s your property, your money to build the property, and it would save you a large amount of time and money if you were able to live where you work instead of driving home every day to another location. More regulation always helps.
Thanks, Mike. Since we’re building on a slab and don’t have any attic area there’s really no place to put a cleanout that will be accessible (unless we incorporate it into the wall design). I’d much rather pull the toilet than have to cut drywall.
Our plumbing is very concentrated in one corner of the house and our particular design doesn’t allow space for future expansion. Any remodeling like that will need to be fairly extensive and we’d simply fold plumbing changes in with everything else.
Thanks for your comments on the pictures and work.
Great plumbing! I was looking on the web for plumbing images that show multiple fixture drains to use in a class I’m teaching and found these. I was wondering if it would be okay to use them (with credit to the site).
thanks,
Laura
Thanks, Laura. You’re welcome to use the photos in your class but please keep in mind that I’m not a licensed plumber, just an ambitious owner builder and the photos should be used for general reference only. I built to code but code may be different where you are. 🙂