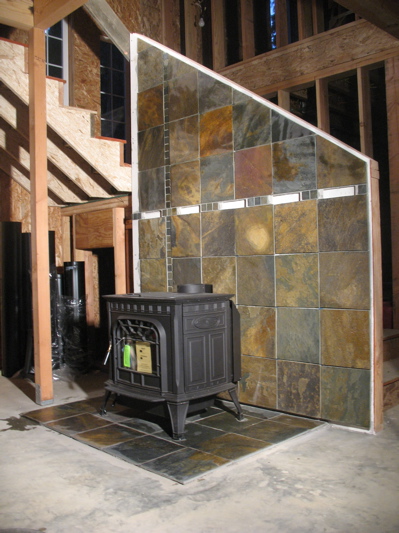
I was planning on a similar wood stove placement (in the “L” of the staairs) but changed to zero clearance insert due to minimum wall clearance specs from stove mfg. which caused the stove to stick too far out in the room. How did you get away wth putting is so close to the back wall? Extra non-combustible wall board? Building inspector signed off?
Tom, originally we had planned to put against an outside wall on the opposite side of the room (that’s where it was in our plans) however after getting the building up and talking to the local stove distributor we decided to move it as it will heat better and be a more straightforward installation with less impact on the usable space. I spoke with our inspector before the install and he said that as long as it is installed according to the manufacturer’s recommendations we were ok to move it.
I’m relying on the distributor to know how close we can put it to the wall and, as they did the installation they’ll have to deal with the situation if we have to move it.
The reason we can put it so close is a combination of things:
There is an extra heat shield on the back of the stove. This is an accessory that was added before it was placed and reduces the clearances somewhat.
The wall behind the stove has an air gap with a vent at the bottom and a vent at 4 feet. This air gap with the vents provides a place for the hot air behind the stove to circulate. There’s less heat buildup on the wall because convection moves the hot air away and draws in cooler air at the bottom. According to the installers, this feature reduces clearances by 66%.
The wall behind, moving from the stairs out is:
stick framed 2×4
3/8″ OSB for stiffness
1/2″ drywall
2″ square blocks of 1/2″ backerboard stacked to create a 1″ air gap
1/2″ backerboard to mount tile on.
mortar
slate tile
Thanks, that helps. If I may, what is the stove manufacturer you used?
Looks great Matt – good work!
I was planning on a similar wood stove placement (in the “L” of the staairs) but changed to zero clearance insert due to minimum wall clearance specs from stove mfg. which caused the stove to stick too far out in the room. How did you get away wth putting is so close to the back wall? Extra non-combustible wall board? Building inspector signed off?
Tom, originally we had planned to put against an outside wall on the opposite side of the room (that’s where it was in our plans) however after getting the building up and talking to the local stove distributor we decided to move it as it will heat better and be a more straightforward installation with less impact on the usable space. I spoke with our inspector before the install and he said that as long as it is installed according to the manufacturer’s recommendations we were ok to move it.
I’m relying on the distributor to know how close we can put it to the wall and, as they did the installation they’ll have to deal with the situation if we have to move it.
The reason we can put it so close is a combination of things:
The wall behind, moving from the stairs out is:
Thanks, that helps. If I may, what is the stove manufacturer you used?
We have a Harman Oakwood stove.